The Gallipoli Campaign
By early 1915, the First World War had already become something far more grinding than many leaders had expected. On the Western Front, the armies of Britain, France, and Germany were locked into trenches stretching from the Channel coast to Switzerland, and neither side seemed able to deliver a decisive blow. The search began for another way to hurt Germany and its allies, and that search soon drew attention to the Ottoman Empire, which had entered the war on the side of the Central Powers in late 1914.
The key was the Dardanelles, the narrow waterway linking the Aegean Sea to the Sea of Marmara and, beyond that, to Constantinople, now Istanbul. If Allied warships could force their way through the strait, they might threaten the Ottoman capital directly. Even more importantly, they could open a sea route to Russia, Britain and France’s hard-pressed eastern ally, which desperately needed supplies, weapons, and equipment. In theory, a successful operation could knock the Ottoman Empire out of the war, encourage neutral Balkan states to join the Allied cause, and relieve pressure elsewhere.
It was an attractive idea, especially because it seemed to offer movement in a war that had become defined by mud, wire, and deadlock. Winston Churchill, then First Lord of the Admiralty, became one of the strongest advocates of the plan, although he was far from the only senior figure drawn to it. The problem was that the plan looked much simpler on maps in London than it would prove to be on the waters and cliffs of the Dardanelles. The strait was narrow, heavily mined, and protected by Ottoman forts and mobile artillery batteries.
The Allies also underestimated their opponent. Outsiders often described the Ottoman Empire as weak or declining, but that did not mean its soldiers would not fight with determination on ground they knew, and for a capital they were expected to defend. German military advisers, including General Otto Liman von Sanders, helped strengthen Ottoman preparations. Among the Ottoman officers watching the threat develop was Mustafa Kemal, a commander whose actions at Gallipoli would later become central to his reputation. Before Allied troops ever landed on the peninsula, the campaign was already becoming a contest between bold strategy and dangerous assumption.
Planning the Campaign: Ambition, Assumptions, and Dangerous Optimism
The first major Allied attempt to break through the Dardanelles was not a land invasion but a naval attack. British and French warships bombarded Ottoman forts in February and March 1915, hoping that naval power alone could clear the way to Constantinople. This approach rested on a bold belief: that old battleships, many of them no longer suitable for the main fleet battle in the North Sea, could be used to force a strategic decision in the eastern Mediterranean. It was an imaginative use of resources, but imagination is not the same thing as preparation.
On 18 March 1915, the naval attack reached its critical moment. Allied battleships entered the strait and bombarded the Ottoman defences, but they ran into a deadly combination of mines and gunfire. Several ships were sunk or badly damaged, including the French battleship Bouvet and the British battleships Irresistible and Ocean. The losses shocked Allied commanders and showed that the Dardanelles could not simply be battered open from the sea. The mines were especially devastating, and the Ottoman defenders had proved more resilient than expected.
After the failure of the naval attack, the campaign shifted towards an amphibious landing. Troops would seize the Gallipoli peninsula, capture the high ground overlooking the strait, silence the Ottoman guns, and allow the fleet to pass through. This required careful coordination between ships, soldiers, supplies, intelligence, and timing. Unfortunately for the men who would be sent ashore, the planning was rushed, the maps were often poor, and the terrain was not fully understood. Gallipoli was not a gentle landing ground waiting to be occupied; it was a rugged peninsula of steep ridges, scrub-covered slopes, gullies, ravines, and narrow beaches.
Command of the Mediterranean Expeditionary Force was given to General Sir Ian Hamilton. His force included British, French, Australian, New Zealand, Indian, and Newfoundland troops, among others, reflecting the global nature of the British Empire and the wider Allied war effort. The campaign’s planners believed speed would be essential, because once Ottoman reinforcements arrived, the peninsula would become far harder to take. Yet the Ottoman defenders had already been alerted by the naval operations, meaning the element of surprise was slipping away before the landings even began. The Allies were about to attempt one of the most difficult military operations imaginable: landing troops on hostile shores, then pushing inland against defenders who held the heights.
The Landings Begin: Cape Helles, ANZAC Cove, and the Fight for a Foothold
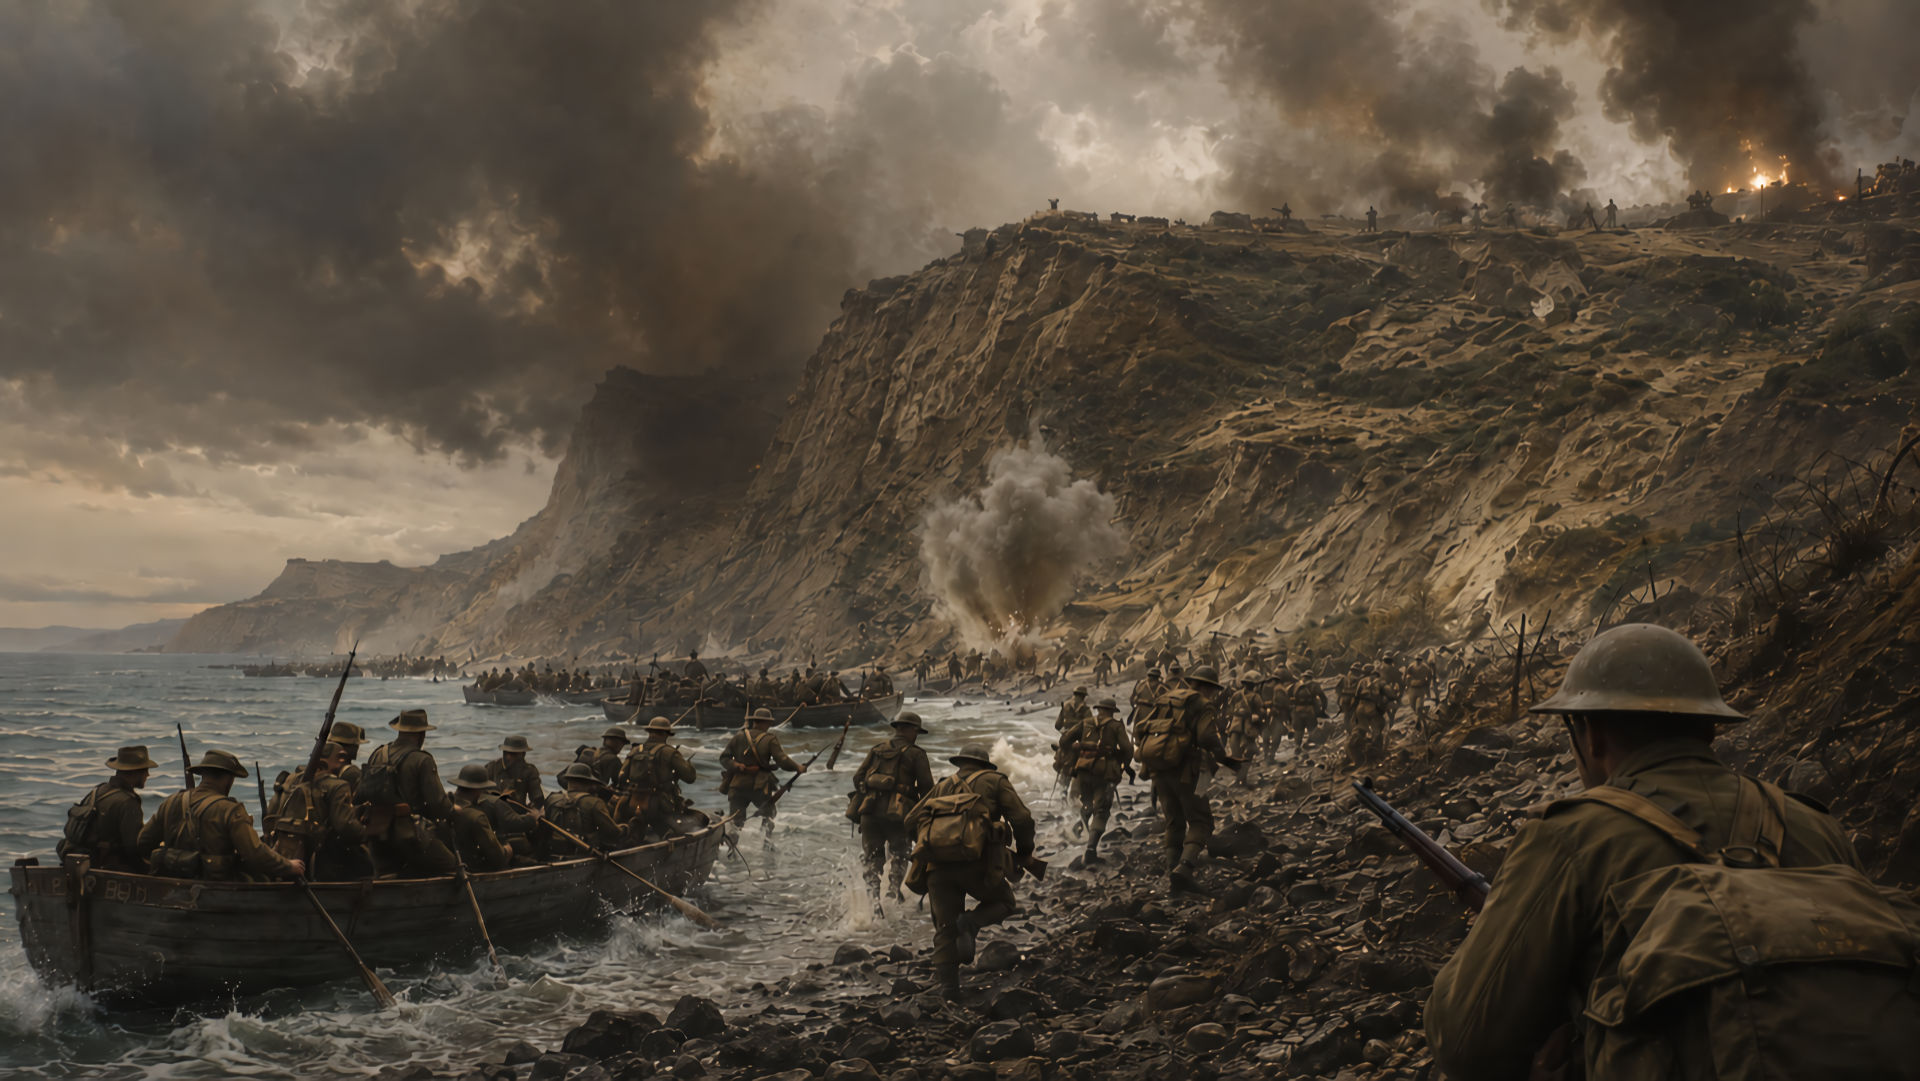
The landings began on 25 April 1915. At the southern tip of the peninsula, British forces came ashore around Cape Helles, aiming to push inland and capture key positions that would open the route north. Further up the western coast, troops of the Australian and New Zealand Army Corps landed in what became known as ANZAC Cove. French forces also landed on the Asian side of the Dardanelles at Kum Kale as a diversion before later joining the fighting at Helles. From the beginning, the operation was chaotic, costly, and much harder than planned.
At Cape Helles, some landings met limited resistance, but others became scenes of terrible slaughter. At V Beach, troops from the Royal Dublin Fusiliers, Royal Munster Fusiliers, and Hampshire Regiment faced fierce Ottoman fire as they tried to get ashore from boats and from the converted collier River Clyde. Many men were hit before they could even reach cover. The landing showed the brutal reality of amphibious warfare before modern landing craft, proper close support, and reliable communications. Courage was abundant, but courage alone could not cancel out machine guns, barbed wire, confusion, and exposed beaches.
At ANZAC Cove, the situation was different but equally difficult. The Australians and New Zealanders landed north of their intended position, facing steep, broken ground that made rapid movement inland almost impossible. Small groups climbed gullies and ridges under fire, often unsure exactly where they were. Ottoman counter-attacks, directed in part by Mustafa Kemal, stopped the ANZAC troops from breaking out onto the high ground. Kemal famously understood that the heights were the key to the campaign, and his swift action helped prevent the landings from becoming an Allied success.
By the end of the first day, the Allies had gained footholds, but not the decisive positions they needed. They held beaches and narrow strips of land, not the commanding heights that controlled the peninsula. The Ottoman defenders had suffered heavily too, but they had achieved the most important objective: they had contained the invasion. Once the Allies were pinned into cramped bridgeheads, the campaign began to change character. What had been imagined as a rapid thrust inland was turning into another version of the war the Allies had hoped to escape, with trenches, attrition, and men clinging to ground measured in yards.
Trench Warfare on the Peninsula: Heat, Disease, and Stalemate
Once the first landings failed to deliver a breakthrough, Gallipoli settled into a grim pattern of trench warfare. The terrain made everything harder. At ANZAC, the lines twisted through ridges and gullies where opposing trenches could be terrifyingly close, sometimes only a few dozen yards apart. At Helles, the fighting more closely resembled the Western Front, with repeated attacks against defended positions and heavy casualties for limited gains. The peninsula became a place where movement was dangerous, supply was difficult, and survival depended on endurance as much as tactics.
The conditions were appalling. Summer heat baked the trenches, water was scarce, and sanitation quickly collapsed under the strain of thousands of men packed into narrow positions. Flies swarmed over food, corpses, and latrines, spreading disease with ruthless efficiency. Dysentery became widespread, weakening men who were already exhausted by fighting, digging, carrying supplies, and living under constant threat of shellfire and snipers. Gallipoli was not only a battle against Ottoman soldiers; it was a battle against thirst, infection, heat, cold, poor food, and the simple physical misery of the place.
The dead also shaped the battlefield. In May 1915, after particularly heavy fighting around ANZAC, a brief armistice was arranged so both sides could bury bodies lying between the lines. The scene left deep impressions on those who witnessed it, because the gap between heroic language and battlefield reality could not have been clearer. Men who had never met, and who had been ordered to kill one another days earlier, now moved among the dead under a temporary truce. Then the fighting resumed, as if the pause had been no more than a grim interruption.
Commanders on both sides searched for ways to break the deadlock, but local attacks often achieved little beyond lengthening casualty lists. Allied assaults at Helles, including the Battles of Krithia, failed to produce the hoped-for advance. Ottoman troops, for their part, launched counter-attacks that were often brave but costly. The defenders held the advantage of terrain, interior lines, and a clear strategic purpose: to prevent the Allies from reaching the high ground and threatening the strait. By mid-1915, the campaign had become a trap. The Allies had too much invested to withdraw easily, but too little success to justify confidence.
The August Offensive: One Last Attempt to Break Through
By the summer of 1915, Allied commanders knew that the campaign needed a major change or it would fail. The result was the August Offensive, an ambitious attempt to break the stalemate at ANZAC while opening a new landing area at Suvla Bay. The plan involved attacks from the existing ANZAC positions towards the Sari Bair range, including Chunuk Bair, while fresh troops landed at Suvla and moved inland. If successful, the offensive could seize the high ground, split the Ottoman defence, and finally unlock the peninsula. It was a plan with genuine strategic logic, but it depended on speed, coordination, and clear leadership.
The fighting began in early August and quickly became ferocious. Australian troops attacked at Lone Pine, where brutal close combat took place in trenches roofed with logs and earth. The attack succeeded in capturing the position, but at a terrible cost. Elsewhere, the famous charge at The Nek became one of the most tragic episodes of the campaign. Waves of Australian light horsemen attacked across a narrow front after artillery support failed to achieve what had been hoped. The result was devastating, with men cut down in minutes for no meaningful gain.
New Zealand troops reached Chunuk Bair, one of the most important heights in the campaign. For a brief moment, the summit was in Allied hands, and the possibility of success seemed real. Yet the position was exposed, reinforcements were slow, communications were poor, and Ottoman counter-attacks were relentless. Mustafa Kemal again played a decisive role, helping organise the response that drove the Allies back. Chunuk Bair became a symbol of courage and missed opportunity, a place where men reached the edge of success but could not hold it.
At Suvla Bay, the new landing failed to deliver the rapid inland advance the plan required. The troops landed with relatively little opposition at first, but delays, confusion, thirst, and cautious command allowed Ottoman forces time to reinforce the area. What might have become a decisive manoeuvre instead became another static front. The August Offensive had been the Allies’ best chance to transform the campaign, but by the end of the month, that chance had gone. Gallipoli was no longer a bold gamble waiting to pay off. It was a failing operation, sustained by bravery at the front and uncertainty at the top.
Evacuation and Legacy: Defeat, Memory, and the Making of Nations
After the failure of the August Offensive, the question was no longer how to win Gallipoli but how to end it. The campaign had consumed lives, ships, supplies, and political confidence. Sir Ian Hamilton was replaced, and senior British commanders began to accept that withdrawal might be unavoidable. This was not an easy decision. Evacuating troops from exposed beaches under the eyes of the enemy could have become a disaster, especially if Ottoman forces realised what was happening and attacked during the withdrawal.
Remarkably, the evacuation became the most successful part of the campaign. In December 1915, Allied forces withdrew from ANZAC and Suvla with careful planning, deception, and minimal casualties. Helles was evacuated in January 1916, bringing the campaign to an end. Ingenious tricks helped conceal the retreat, including rifles rigged to fire after troops had left, giving the impression that positions were still occupied. After months of failed assaults, the Allies finally carried out a complex operation with skill and discipline. It was a strange ending: a campaign remembered as a disaster concluded with an evacuation that was almost flawlessly executed.
The cost had been immense. Allied casualties totalled well over 200,000, including killed, wounded, missing, and sick, while Ottoman casualties were also extremely high. The exact figures vary by source and category, but the human scale is beyond dispute. Gallipoli damaged reputations in Britain, contributed to Winston Churchill’s temporary fall from high office, and raised hard questions about planning, intelligence, and command. For the Ottoman Empire, the defence of Gallipoli was a major victory at a time when the empire was under enormous pressure on multiple fronts.
The legacy of Gallipoli reached far beyond military history. In Australia and New Zealand, the campaign became central to national memory, with ANZAC Day, marked on 25 April, becoming a day of remembrance for those who served and died. In Turkey, the battle became associated with resistance, sacrifice, and the rise of Mustafa Kemal, later Atatürk, founder of the Turkish Republic. Gallipoli did not decide the First World War, but it became one of its most powerful symbols. It was a campaign born from strategic ambition, undone by poor assumptions, and remembered through the courage of soldiers on both sides who endured one of the war’s harshest battlefields.